
If you ever played any big title game for MS-DOS in the 90's, I'll bet that one of the first things you saw was a message saying something about "DOS/4GW."

I didn't think much of this message when I was younger, but as I started learning about programming for the MS-DOS, things started to make a lot more sense.
I'll try to keep this article as short and as beginner-friendly as possible. The goal here is to put things into historical context so we understand what DOS/4GW really is.
We'll start our conversation by saying that DOS/4GW is a DOS extender. That means DOS/4GW is a program responsible for adding some useful stuff on top of the vanilla DOS kernel you have installed on your system. And look, I know this does not really answer anything yet, but we'll get there.
Let's begin our journey trying to understand why DOS needs extending in the first place.
Direct Hardware Access
If you were a programmer back in the 80s, you probably noticed a shift in the way we think about software. Most new operating systems (Windows, OS/2, UNIX) added a protection shield between the programmer and the hardware. If your code had to access some machine hardware resource, you had to so via the operating system API.
These APIs were designed with more serious applications in mind, like databases or spreadsheets, so limiting hardware access was a pretty smart thing to do. The OS gives each application some resource and protects it from directly accessing the memory space of other applications.
Unfortunately, full direct access to hardware was something game developers relied on for performance-enhancement tricks. And since MS-DOS did allow direct hardware access, it got some attention from PC game programmers as a system of last resort. That being said, DOS programming came with its own set of limitations.
One of the most popular limitations was the fact that the maximum amount of memory available for DOS programs was just 640 kilobytes! Well, even less than that, since DOS itself and device drivers like HIMEM and EMM386 also used RAM.
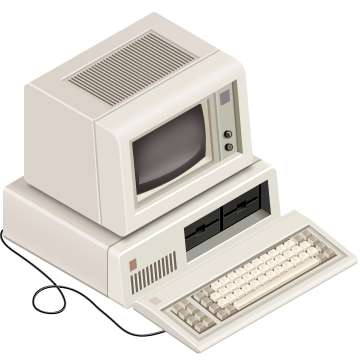
The IBM PC
To understand this 640 KB limitation, we need to understand a little bit about how the original IBM PC was designed. The IBM Personal Computer was the first computer released in the IBM PC line. It was powered by an Intel 8088 processor, which was a cheaper version of the Intel 8086 CPU.
The 8088 processor had an 8-bit external data bus and a one megabyte address range.
A complete Memory Map of the IBM PC can be found on the IBM PC Technical Reference, but here is an extremely simplified view of the IBM PC memory layout:
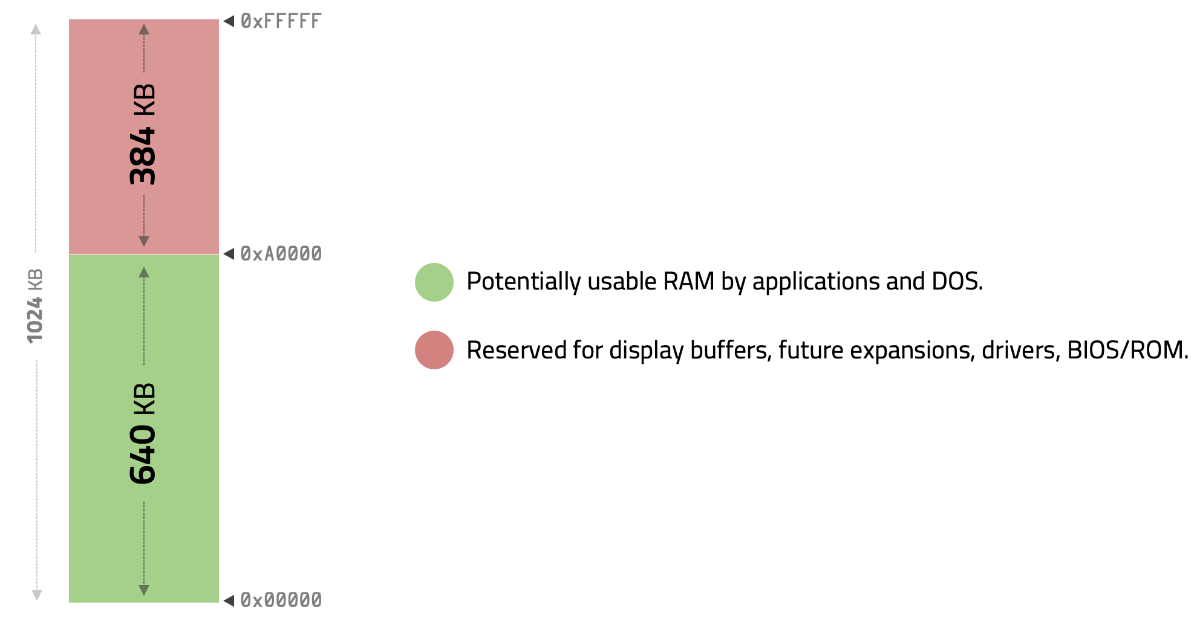
The original IBM PC could only visualize the first 1 MB of addressable memory. And from this first megabyte, only the bottom 640 KB could be used by applications, leaving the other 384 KB reserved for things like display buffers, expansion, BIOS and ROM.
Fun fact: As the legend goes, Bill Gates was at a computer trade show in 1981 and uttered the phrase "640K ough to be enough for anybody!". The quote ran the world, but when asked about this years later, Gates denied ever saying it.
Just to put things into context, remember when I said that DOS allowed direct hardware access? I want you to pay attention to the address 0xA0000 that sits at the very start of the reserved upper part of our first 1 MB. The location 0xA0000 is mapped to the start of the EGA and VGA graphics buffers.
Since we have direct hardware access, if we wanted to paint a pixel on the display, all we had to do is treat the bytes from 0xA0000 as if they were a large array of bytes (char). When we assign values to the bytes in that array, the display driver will map and paint the correct pixels on the screen.
For example, we can create a far pointer that points to memory segment 0xA000. Using a far pointer is necessary to allow the C compiler to access the full 1 MB address range. We can even take advantage of the Borland macro MK_FP to "make a far pointer" for us.
char far *screen = (char far *) MK_FP(0xA000, 0); screen[0] = 14; |
To paint the first pixel on the top-left of the display using mode 13h, we could simply set a value to that memory address directly. In the example above, the number 14 is the value of a bright yellow color from the VGA palette.
Was that easy or what? So easy it became illegal in most modern operating systems.
This processor mode where we can only visualize the first megabyte of addressable RAM is called “real mode.” The name comes from the fact that addresses in real mode always correspond to real locations in memory. This is a 20-bit segmented memory address space (giving us exactly 1 MB total) with unlimited direct software access to memory.
Real mode provides no support for memory protection, multithreading, or running multiple processes at once.
Fun fact: There were some DOS hacks that tried to poorly simulate multi-tasking. For example, a terminate-and-stay-resident program (or TSR) was a computer program running under DOS that uses a system call to return control to DOS as though it has finished, but remains in computer memory so it can be reactivated later. Needless to say, this was not 100% reliable.
Overcoming the 640 KB Barrier
After the success of the 8088, Intel began designing CPUs to compete with mainframes and minicomputers. One thing that these bigger machines had was larger memory address spaces.

The next generation in the x86 line was the Intel 80286, released in February of 1982 with the IBM PC/AT. The 286 was a 16-bit processor, which means that the 286 could now address up to 16 MB of RAM!
The next generation in the Intel x86 line provided even more power and larger address spaces. Both 386 and 486 were 32-bit CPUs that could now address up to 2³² bytes of memory. In other words, these 32-bit CPUs could manage up to 4 GB of RAM!

That is a lot of RAM. A lot more than the 1 MB we have access to using real mode.
Protected Mode
We had to find a way to gain access to all the RAM address range that these new 16-bit and 32-bit machines allowed. To keep retro compatibility with earlier 8088 programs, Intel designed their new CPUs with split personalities.
We could either run the processor on "real mode", where it could only directly access the first 1 MB of memory, or we could switch and have our CPU run "protected mode."
The 80286 was the first processor to introduce the idea of a protected mode. Running on this mode means we have access to special CPU super powers, like virtual memory, paging, safe multi-tasking, and access to extended memory (addresses above 1 MB).
Due to the enhancements added by protected mode, it has become widely adopted and has become the foundation for all subsequent enhancements to the x86 architecture.
There was just one small issue with protected mode. Compatibility! Protected mode was not compatible with older 8088 or 8086 chips. Intel had to find a way of making these new CPUs compatible with earlier x86 programs. After all, it would be market suicide to release a new CPU that could not run the 8088 programs users paid a lot of hard-earned money for. And here is where the split personalities of these CPUs come in handy.
When an x86 CPU is powered on, it begins executing instructions in real mode in order to maintain backward compatibility with earlier 8088 and 8086 programs. In real mode we have no memory protection, and DOS programs basically assume they are the only process running on that machine.
Newer 16 and 32-bit processors allowed DOS to switch to protected mode. When running on protected mode, an operating system can take advantage of paging, multi-tasking, virtual mode, segmented addressing, and different code privilege levels. But as we know, the classic MS-DOS was not a multi-tasking OS, had no support for multithreading, and could not take advantage of all these protected mode powers. Therefore, programmers started to write their own version of DOS kernel tools to handle these shortcomings.
DOS Extenders
To overcome this issue of having to write entire set of kernel tools to take advantage of protected mode, a special kind of middleware program appeared: the DOS extender!
And they were super effective! These DOS extenders were basically just small OS kernel tools that provided several basic services, like multi-tasking, memory management, memory protection, basic networking support, etc. The extenders saved programmers from having to write all these functionalities from scratch, leaving them to focus exclusively on creating games.
One of the first DOS extenders was the one used by the DJGPP compiler. DJGPP was a free port of GCC for DOS, and initially used a DOS extender called Go32.
Another famous DOS extender was PMODE, created by Thomas Pythel and becoming publicly available in 1994. I personally never used PMODE professionally, but I remember it was developed to be used with programs written in x86 assembly, specifically those using Borland's Turbo Assembler (TASM).
Fun fact: PMODE was initially created to be used by the demoscene, and it became very popular in that context. One of its major differences was its small footprint. PMODE was extremely compact compared to other extenders, increasing the final program executable by approximately 10 KB.
Arguably, the most famous DOS extenders were the ones developed by Rational Systems. The first extender from Rational targeted 80286 processors, allowing programs to address all of 16 megabytes of RAM of the 286. This extender was appropriately called DOS/16M.
The 32-bit version of Rational's extender was developed for 386 processors and higher. Since it targetted 32-bit machines, this extender could address up to 4 gigabytes of RAM, hence the name DOS/4G.
Cool! It looks like we are getting there. Now we know now what DOS/4G means. All we are missing is the "W" of DOS/4GW
DOS/4GW
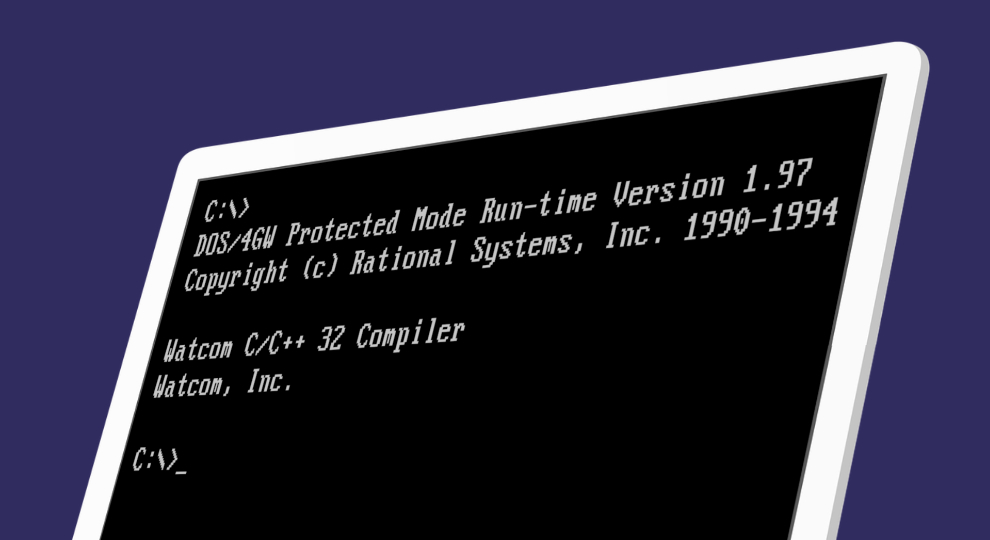
Around 1994, I remember playing a game called TFX. It was developed by British studio Digital Image Design and raised the bar of what I thought was possible in terms of 3D software rendering on MS-DOS.

In the about screen, the developers mentioned some important tools that they used to create the game. As you can see below, they are using Rational's DOS/4GW extender and also something called Watcom C/C++ compiler.
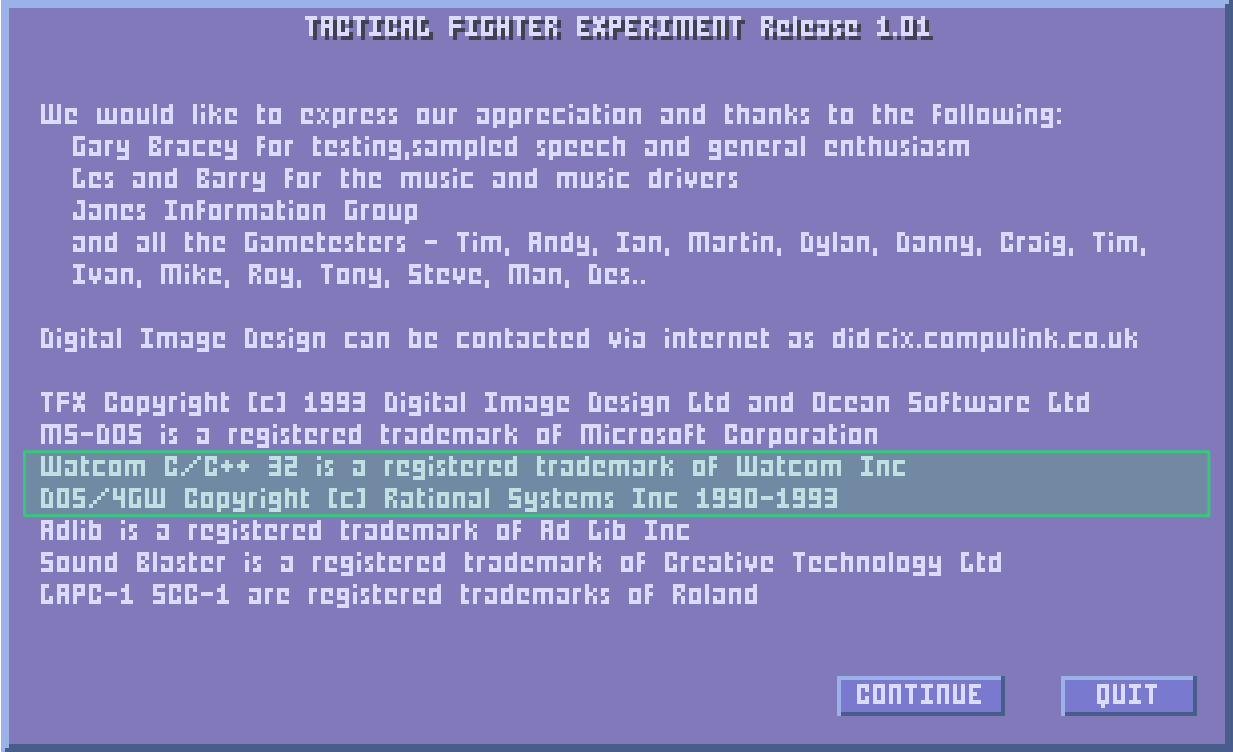
As you probably guessed by now, the W in DOS/4GW stands for "Watcom."
DOS/4GW was a free, stripped-down version of DOS/4G that came with Watcom compilers. At build time, the Watcom compiler would link and bundle the DOS/4GW kernel and add it before the main program.
This is the reason why we always see the "Rational DOS/4GW" copyright banner before games start. Most games from 1992 to 1998, like Doom, Tomb Raider, Duke Nukem 3D, and TFX, used the super powers of the DOS/4GW extender.
Fun fact: The original Wolfenstein 3D engine, created by id Software, was developed using pure real mode. Apogee (the original publisher) wanted to release a sequel for Wolfenstein 3D, so to improve the quality of the final game and unleash 32-bit power, the Wolfenstein 3D engine had to be rewritten to take advantage of protected mode.
Just a quick side note, since we are speaking of Doom and Wolfenstein 3D. If you like learning about retro programming, you should probably check out my lectures on Raycasting Engine Programming. It's a good place to start learning more about retro game development and all these techniques that game programmers used back then.

You'll also hear people say that the DOS4/GW implements the DPMI (DOS Protected Mode Interface). The DPMI is an API for DOS extenders, defining an specification for what extenders should implement and what functions they should expose. The DPMI originated when Microsoft was developing Windows 3.0, and it became an open specification soon after. Almost all modern DOS extenders are based on DPMI.
Putting Everything Together
So, just to make sure we are all on the same page, let's summarize everything we learned so far and try to glue all the pieces together.
First, MS-DOS will always boot up the computer in real mode for compatibility reasons. All applications that ran on DOS that need to take advantage of 32-bit power had to start in real mode and then switch to 32-bit protected mode.
Your game (compiled with the Watcom compiler) would first execute DOS4GW.EXE, which would switch to protected mode and launch your main executable. DOS/4GW will sit between your program (running in protected mode) and legacy real mode resources, like BIOS, interrupt calls, etc.
Also, since your program runs in protected mode, it has all the benefit of using protected mode addressing, which allows addresses beyond the traditional 1 MB real mode limit.
DOS/4GW handles all that noise for us. We could basically just start writing our code as if we had a 32-bit operating system. If you were a DOS programmer back then, this felt like magic!
And that's it for our quick review. If you have any suggestions to this article, you can yell at me on Twitter. Also, remember to visit the courses page to access my lectures on retro programming.
See you inside!